- Details
- Category: Discipline Guides
- Last Updated: Saturday, June 10th, 2017
- Published: Sunday, November 15th, 2015
- Written by Sceviour, Naryik, Bant, & Hayward
Gearing & Stats
The tables on this page were generated using optimizer scripts created by Bant aka Goblin_Lackey. The stats were calculated to give the maximum theoretical DPS/HPS/DTPS for each discipline, however you may wish to alter the builds depending on your play style or what content you are facing in SWTOR. Each table assumes you have a full set of the specified gear.
Suggested Best-in-Slot Stats
| Name | GEMINI MK-5 Tier 4: Legendary (248) |
GEMINI MK-3 Tier 4: Artifact (246) |
Iokath MK-5 Tier 3: Legendary (242) |
Iokath MK-2 Tier 3: Artifact (240) |
Eternal Commander MK-15 Tier 2: Legendary (236) |
Eternal Commander MK-13 Tier 2: Artifact (234) |
| Mastery | 6927 (1xC) | 6662 (1xC) | 6579 (2xC) | 6594 (1xA) | 6385 (1xA, 1xC) | 6302 (1xA, 2xC) |
| Power | 3964 | 3776 | 3694 | 3694 | 3506 | 3424 |
| Critical | 1790 (2xE, 11xA, 1xC) | 1748 (5xE, 4xA, 1xC) | 1705 (2xE, 11xA) | 1691 (2xE, 10xA, 2xC) | 1637 (3xE, 8xA, 1xC) | 1593 (5xE, 4xA) |
| Alacrity | 1617 (7xE) | 1552 (4xE, 7xA) | 1505 (7xE) | 1505 (7xE) | 1422 (6xE, 2xA) | 1368 (3xE, 8xA) |
| Accuracy | 759 (1xE, 3xA, Stim) | 748 (1xE, 3xA, Stim) | 743 (1xE, 3xA, Stim) | 743 (1xE, 3xA, Stim) | 733 (1xE, 3xA, Stim) | 736 (2xE, 1xA, Stim) |
| Absorb | 0 | 0 | 0 | 0 | 0 | 0 |
| Defense | 0 | 0 | 0 | 0 | 0 | 0 |
| Shield | 0 | 0 | 0 | 0 | 0 | 0 |
"E" = Enhancement or Implant or Earpiece
"A" = Advanced _ Augment 45
"C" = Advanced _ _ Color Crystal (+41 ones)
Discipline Statistics
| Name | GEMINI MK-5 Tier 4: Legendary (248) |
GEMINI MK-3 Tier 4: Artifact (246) |
Iokath MK-5 Tier 3: Legendary (242) |
Iokath MK-2 Tier 3: Artifact (240) |
Eternal Commander MK-15 Tier 2: Legendary (236) |
Eternal Commander MK-13 Tier 2: Artifact (234) |
| DPS | 9,520 +/- 268 | 9,158 +/- 253 | 8,937 +/- 244 | 8,870 +/- 241 | 8,522 +/- 228 | 8,256 +/- 217 |
| APM | 44.6 | 44.5 | 44.3 | 44.3 | 44.1 | 44 |
DPS Rankings
Note: DPS rankings assume best-in-slot 242-rating gear.
Suggested Best-in-Slot Gear & Items
| Type | Quantity | Name |
| Augment | 11 | (228) |
| Augment | 3 | (228) |
| Enhancement Earpiece Implant | 7 | or or (248) |
| Enhancement Earpiece Implant | 2 | or or (248) |
| Enhancement Earpiece Implant | 1 | or or (248) |
| Color Crystal | 1 | (136) |
| Color Crystal | 1 | (136) |
| Mod | 9 | (248) |
| Relic | 1 | (248) |
| Relic | 1 | (248) |
| Armoring | 8 | (248) |
| Hilt | 1 | (248) |
| Stim | 1 | |
| Medpac | N/A | |
| Adrenals | N/A | or or |
Set Bonuses
| Pieces | Set Bonus |
| 2 | Turbulence or Force Serenity and Thundering Blast or Force Leech increase damage dealt by 2% for 15 seconds. Cannot occur more than once every 30 of seconds. |
| 4 | Reduces cost of Lightning Strike and Force Lightning or Disturbance and Telekinetic Throw by 2 and reduces the cooldown of Polarity Shift or Mental Alacrity by 15 seconds. |
| 6 | Lightning Strike and Lightning Bolt or Disturbance and Telekinetic Burst reduce the cooldown of Recklessness or Force Potency by 1 second. |
Abilities
Madness Discipline Abilities
| Name | Description | Type |
| Steals life from an enemy, dealing <<1>> internal damage to the target and healing you for 50% of the damage dealt. | Casted | |
| Paralyzes the target in fear, dealing <<2>> internal damage over 18 seconds and immobilizing it for 2 seconds. The immobilizing effect cannot occur more than once every 9 seconds. | Instant | |
| Crushes the target with devastating force, dealing <<1>> kinetic damage initially, plus an additional <<2>> kinetic damage over 6 seconds. The target also becomes Vulnerable for 45 seconds, increasing the damage taken from Force attacks by 5%. Replaces Crushing Darkness. | Casted | |
| Creates a death field at the target location, dealing <<1>> internal damage and stealing life from affected targets to heal you for 10% of the damage dealt. Strikes up to 8 targets within a 5-meter radius. | Instant |
Sith Sorcerer Advanced Class Abilities
| Name | Description | Type |
| Immediately heals the target for <<1>>, plus an additional <<2>> over 9 seconds. | Instant | |
| Immediately restores <<1>> health to you. Cannot be used on others. | Instant | |
| Revives an incapacitated ally. This ability is usable while in combat. When used, all group members can neither use nor be the target of an in-combat revival for the next 5 minutes. | Casted | |
| Your connection to the Force shifts, granting 20% alacrity and immunity to pushback and interrupts for 10 seconds. | Instant | |
| Summons a dark cloud of energy to crush the target, instantly dealing <<1>> kinetic damage and an additional <<2>> kinetic damage over 6 seconds. | Casted | |
| Activating this ability marks your current location for 10 minutes. When this ability is activated again, if you are within 60 meters of the marked location, you instantly return to the marked location. Phase Walk goes on cooldown for 60 seconds when used to return to the marked location. | Casted | |
| Wipes your enemies' thoughts, instantly lowering your threat by a moderate amount. | Instant | |
| Casts a powerful Force affliction upon the target that deals <<1>> internal damage over 18 seconds. | Instant | |
| Lowers the target's threat by a moderate amount and, if the target is a group member, pulls the target to your location. | Instant | |
| Consumes the dark energy around you, restoring 40 Force. Utilizing Consuming Darkness makes you Weary, reducing your Force regeneration rate by 2 for 10 seconds. This effect can stack up to 4 times. | Instant | |
| Deals <<1>> energy damage to the target and consumes 40 Force over the duration of the channel. Also slows the movement speed of the target by 50% and immobilizes weak and standard enemies. | Channeled | |
| Calls down a Force storm over the target area, consuming 60 Force and dealing <<1>> energy damage to up to 8 targets within 8 meters over the duration of the channel. Standard and weak targets have a 33% chance to be stunned by the storm each second. | Channeled | |
| Fires a charge of lightning at the target, deals <<1>> energy damage. | Casted | |
| Cleanses a friendly target of up to 2 negative mental or Force effects. | Instant | |
| Projects a Force Barrier around you, granting immunity to all control, damage, and negative effects while channeled. This ability does not respect the global cooldown and can be used while controlled. While you are protected by Force Barrier charges will build up and grant Enduring Bastion, a shield that absorbs an amount of damage based off the charges that are present when Force Barrier ended. Enduring Bastion also grants immunity to interrupts. | Channeled | |
| Surrounds the target in a lightning shield that lasts 30 seconds and absorbs a high amount of damage. The target becomes deionized and cannot benefit from Static Barrier again for 20 seconds. | Instant | |
| Heals a friendly target for <<1>> health. | Casted | |
| Increases mastery, endurance, and presence for you and your Operation group members within 40 meters by 10%. Lasts 10 seconds. | Instant |
Sith Inquisitor Class Abilities
| Name | Description | Type |
| Deals <<1>> energy damage and knocks back up to 8 enemies within a 15-meter cone in front of you. Standard and weak enemies are additionally knocked down for 3 seconds. | Instant | |
| Grants 2 charges of Recklessness, which increases the Force critical chance of your direct attacks and heals by 60%. Each time a direct Force ability critically hits or each time a channeled Force ability is activated, 1 charge is consumed. Lasts 20 seconds. | Instant | |
| Shocks the target for <<1>> energy damage. Standard and weak targets are additionally stunned for 3 seconds. | Instant | |
| Deals <<1>> kinetic damage and slows the target's movement speed by 50% for 6 seconds. | Instant | |
| Traps the target in a whirlwind for 8 seconds. Non-player, non-standard, and non-weak targets heal rapidly while trapped. Damage causes this effect to end prematurely. | Casted | |
| Increases movement speed by 150% for 2 seconds. Does not break Stealth. | Instant | |
| Interrupts the target's current action and prevents that ability from being used for 4 seconds. | Instant | |
| Electrocutes the target, dealing <<1>> energy damage and stunning it for 4 seconds. | Instant | |
| Summons the unbreakable will of the Sith, immediately purging incapacitating and movement-impairing effects. | Instant | |
| Deals <<1>> weapon damage spread across a flurry of 3 melee attacks. | Instant | |
| Increases the target's Mastery by 5% and internal and elemental damage reduction by 10% for 60 minutes. If the target is a group member, all other group members are also affected. | Instant | |
| Seize the moment, restoring 2% of your maximum health every 3 seconds. Requires an active companion. Lasts 60 seconds. | Instant |
Rotation
Madness Sorcerer/Balance Sage is a spec that revolves around using Damage Over Time abilities to kill your opponents, as opposed to direct damage abilities like lightning/telekinesis which focus on burst damage. To successfully play Madness/Balance in 8v8, 4v4 and open world, your first priority is to stay alive. Mobility is key and using your utilities to focus on locking the enemy down, and keeping your distance will allow you to truly maximize your potential.
Rotation
Demolish > Affliction > Death Field > Clipped Force Lightning > Force Leech > Creeping Terror > Full Force Lightning > Full Force Lightning > Full Force Lightning
Demolish > Clipped Force Lightning > Death Field > Affliction > Clipped Force Lightning > Lightning Strike > Clipped Force Lightning > Creeping Terror > Clipped Force Lightning > Force Leech
Demolish > Clipped Force Lightning > Death Field > Clipped Force Lightning > Lightning Strike > Affliction > Clipped Force Lightning > Force Leech > Clipped Force Lightning > Creeping Terror
Demolish > Clipped Force Lightning > Death Field > Full Force Lightning > Full Force Lightning > Full Force Lightning > Affliction > Force Leech > Clipped Force Lightning
Demolish > Creeping Terror > Death Field > Full Force Lightning > Full Force Lightning > Full Force Lightning > Force Leech > Clipped Force Lightning > Affliction
Demolish > Clipped Force Lightning > Death Field > Creeping Terror > Full Force Lightning > Force Leech > Full Force Lightning > Full Force Lightning > Clipped Force Lightning
Filler:
Minor Rotation: 10 GCDs
Major Rotation: 60 GCDs
Comments: Clipped Force Lightning = Clip at 1.5s
References: Bant
There is still much debate regarding what the best spec is for Madness PVP. One theory favors going with the heavy up front burst path for solo ranked. Others prefers to go with low burst/Crit but high Alacrity, which gave rise to the 3rd rotation below. Depending on your playstyle, pick the rotation that works best for you.
Rotation Option 2 (Recommended for Crit Spec unranked): Force Lightning -> Affliction -> Creeping Terror -> Death Field -> Demolish -> Force Leech -> Recklessness -> Force Lightning (stop it after 1 second) -> Unlimited Power -> Force Lightning x2 -> Polarity shift -> Force Lightning x3 and repeat
Rotation Option 3 (Recommended for Crit Spec Ranked): Force Lightning -> Affliction -> Creeping Terror -> Recklessness -> Polarity Shift -> Demolish -> Force Leech -> Death Field -> Force Lightning x 4 times then starting with Affliction to repeat the rotation
Rotation Option 4 (Recommended for Alacrity Spec ranked & unranked): Polarity Shift > Unlimited Power > Affliction > Creeping Terror > Recklessness > Death Field > Force Lighting > Demolish > Leech
Comments: For the 2nd rotation option, make sure to time the Force Leech -> Death field combo to hit at the same time. It's pretty easy to do but do that to have the biggest burst you can get. If you want good sustained DPS that you can just spam away from range and want good DoT spread, use the 1st rotation option. If you want high burst that can help kill a target in very little time, use the 2nd rotation option. For the first Force Lightning in both rotations, make sure you get your 4 stacks of Wrath and Fulminating Current before moving on.
Advanced Tactics
Advanced Tactics
Stay Alive
As a Sorcerer, your main job is to stay alive. In 90% of ranked games, you'll be the first focused guaranteed. Because of this, your primary goal is not dying. In all the games I've played in ranked, the games that I die first is a game I've lost, guaranteed. The games where I die after we've dropped one of the enemy team, there's a 50/50 chance of winning or losing and the games where I'm the last man standing is a 90% chance to win.
Open Up
If it's the rare case where you're not focused first, then it's time to show what you've got. Utilize all the tactics in your arsenal. Kiting, Line-of-Sighting, as well as your class abilities like Force Speed, Force Barrier, and your numerous CC abilities. Typically, in the games you're not focused first, if you're not pulling top damage then you're not utilizing Madness to its full potential. When left alone to ‘Free Cast' (successfully pulling off your rotation consistently without any enemy focus), Madness Sorcerers have some of the highest DPS potential of any class in its current state.
Emersion is a must have utility
Force Speed + the Emersion utility is probably my most used escape move in ranked and it has saved my *** countless times. Plus, there's always something satisfying about watching a Jugg mindlessly slash at the air while you sprint to safety.
Use your Force Barrier strategically
Sometimes, that means saving it for the very last second before you die. Sometimes that means using it when you're being heavily focused, even though you have 100% health. This can often play to your advantage, as an opponent has a 50/50 chance of blowing their damage increasing cooldowns to open up on you early.
In games where I'm facing high burst DPS classes like Marauders and Assassins, I sometimes pop my Force Barrier as soon as they're locked on to me and starting their rotation, as that burns out their burst on my invincibility shield so that neither I or my team take that high damage. After their burst is wasted on my shield or they've wasted their time striking against my bubble, which inevitably wastes their bursts, I kill them pretty easily.
Using your Barrier is a skill that takes practice to master. It's a tactical ability, and is not a set rule that it must be used in X situation. You just have to watch, and learn, your enemies abilities, and typical patterns/rotations. Then you'll be able to easily determine when to use your barrier, to both stunt the enemies DPS potential, and save yourself from certain death.
Range is crucial
to successfully playing Madness. You're one of the squishiest ranged classes in the game. Staying away from enemies, and using your 30 to 35 meter attacks to your advantage is key to winning most fights. Height is also a significant advantage for ranges classes like yours. In maps like Tatooine Canyon, Alderaan Civil war, or Quesh Huttball, stand on the edges. Stay out of the enemy's area of focus and spam away.
Know your Maps
This goes hand in hand with #5. Take full advantage of the level design used in your maps. In maps like Makeb Mesa, or Orbital Station, it's the smart move to not take the high path first. Knockback or pulls easily separate you from your teammates, taking you out of the fight for sometimes crucial seconds, leading to a loss. In maps with two or more levels, like the ones I mentioned, I'd suggest that your team take the direct route and charge the enemy right out of the gate. Engage them and put them immediately on the defensive. This brings me to my next point.
Engage the Enemy First
Get your attacks out first, in all warzone situations, as soon as possible to try to catch the enemy with their pants down. The longer you wait, or hesitate, the more opportunity you're giving the enemy to prep, organize and get the drop on you. Which means that you'll more than likely lose. Get the first attacks out, attack them as soon as possible and try to catch them with their pants down. The more you wait, the more they prep and organize which means you are generally going to lose.
Play to your Team's Strengths
Lastly, I'm strongly of the opinion that Sorcerers are strongly dependent on their team composition. If you're stuck with a bad team, more than likely you're facing a loss. If you've got a good team with competent players, you'll probably win. If you've got an average team, then you could easily carry the team to victory. That is a rare situation however, which only happens once in a blue moon. This is all less true in 8v8 warzones. One good player could turn the tide of a battle.
PvP
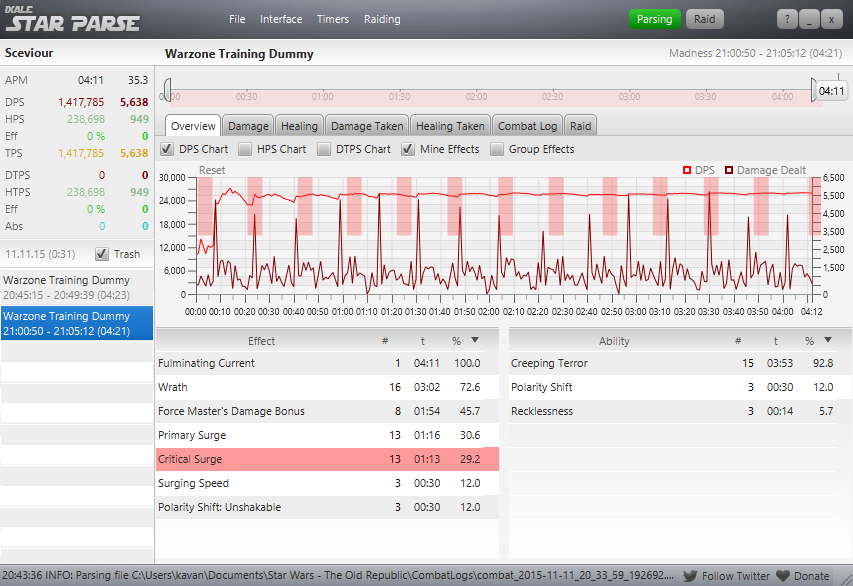
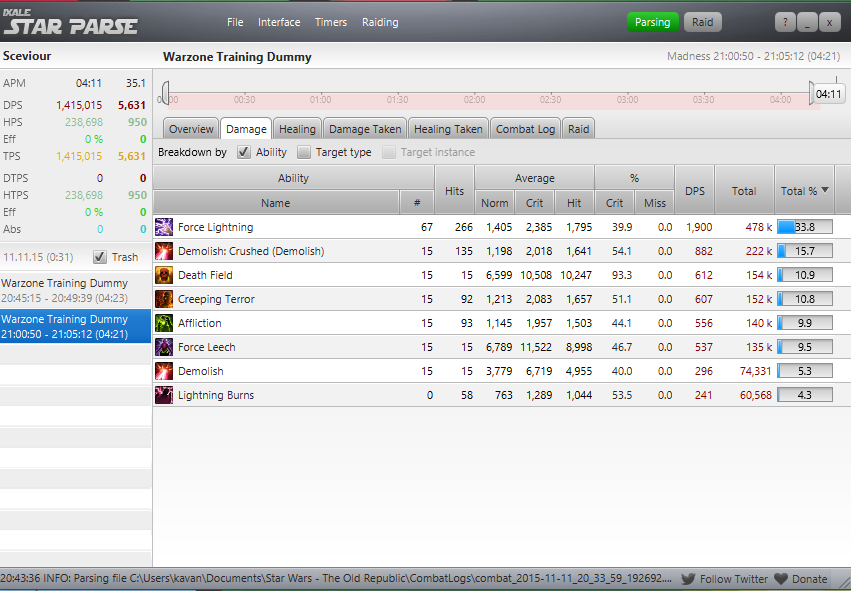
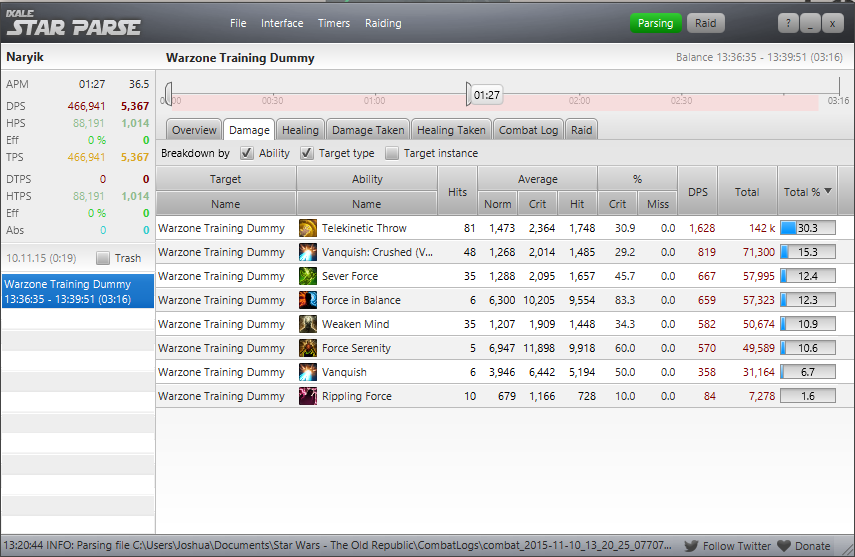
Note: These parses are from 4.0 but are still relatively applicable in 5.x.
Heavy Crit Parse
5,638 DPS, for the time frame of an average ranked match
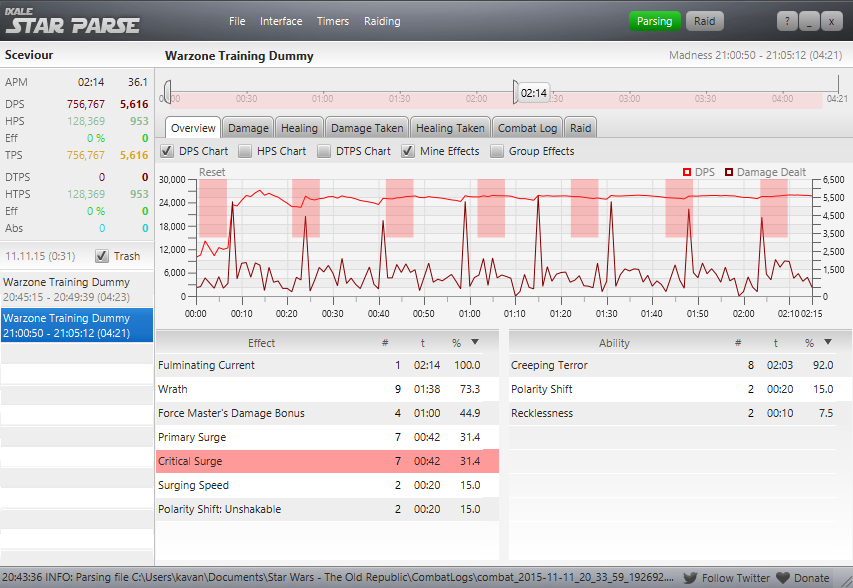
Heavy Alacrity Parse
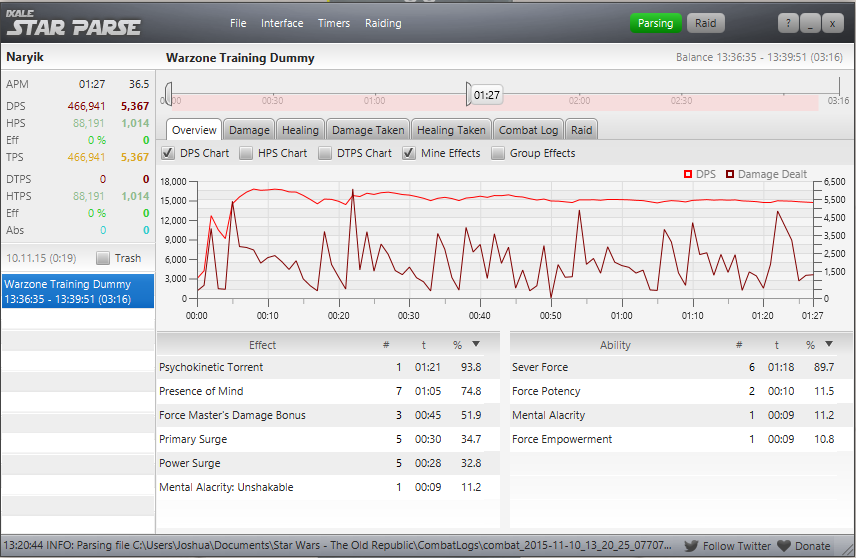
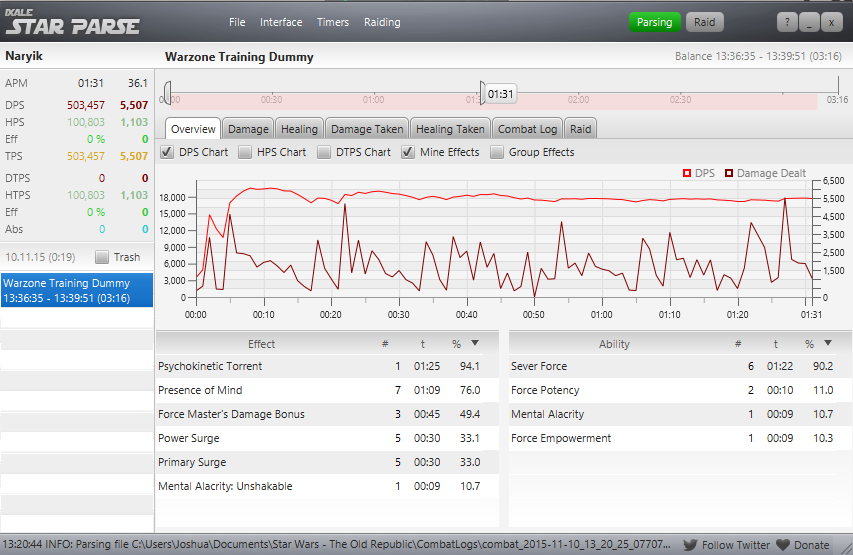
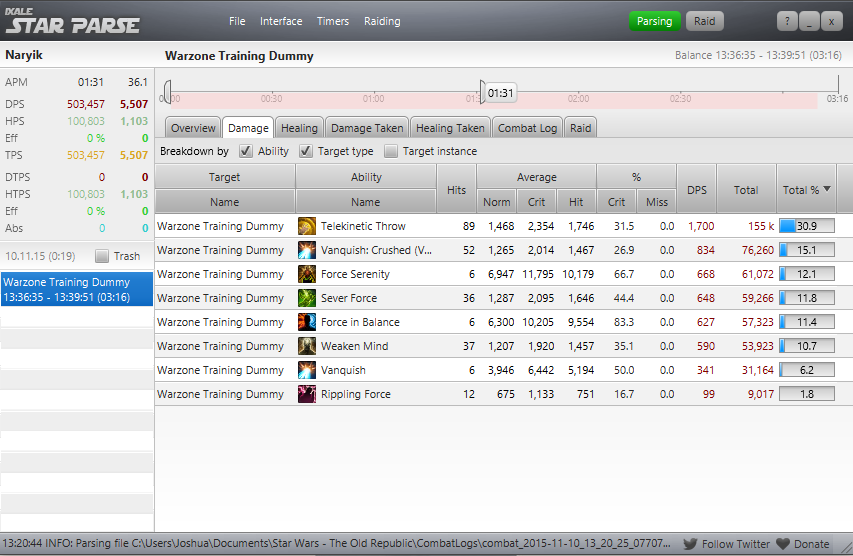
The high crit build is focused towards the most up front damage to kill 1 target as quickly as possible whereas the 2nd build, for high alacrity is built for DoT spread and spreading out as much small damage to as many targets as possible.