- Details
- Category: Warzone Guides
- Last Updated: Sunday, July 9th, 2017
- Published: Monday, July 3rd, 2017
- Written by Ne'laa
Looking for other warzone, arena, and PvP guides? Select from the dropdown to the right:
The Voidstar

The setting for the Voidstar warzone is an abandoned Imperial ship whose datacore contains valuable information and must be downloaded.
The Map and Objectives
Voidstar has 2 rounds: an attacker and a defender round, each lasting a maximum of 7 minutes and 30 seconds. Which team starts as the attacker and which as the defender is random.
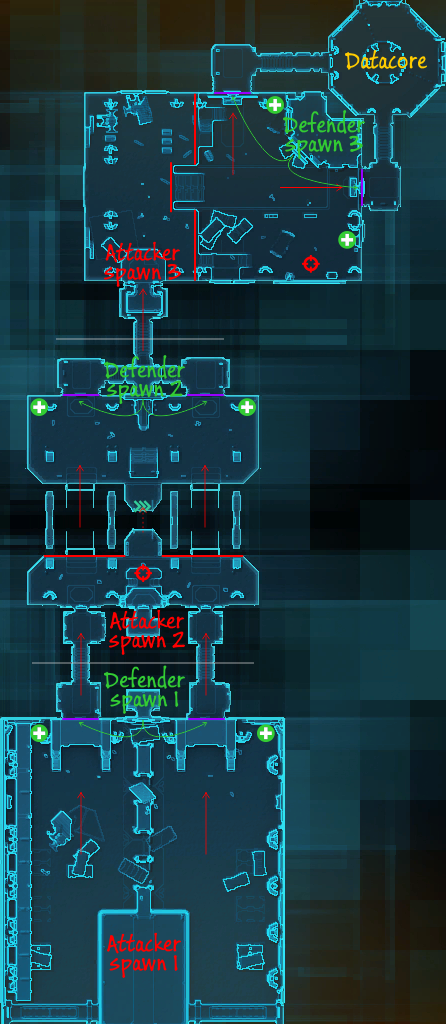
There are 6 checkpoints in Voidstar, most of which can only be passed in sequential order. (With one exception, later on that.) 3 of those are pairs of doors where your team must plant bombs and defend them until they blow, 2 are forcefields your team has to lower and the last one is the datacore itself.
Unlike in other warzones, once you lost an objective, there's no coming back. Teams get points for the number of checkpoints they got through, up to 6. At the end of the game, the team with the higher number of points wins. If neither team gets past through the first pair of doors, whichever team has less deaths wins. At this moment it is unclear to me what the tiebreaker is when both teams pass the first door.
As usual, you have to right-click the marked area on the doors to start planting a bomb. This takes a full 8 seconds and can be interrupted by getting attacked. If you manage to plant, a 20 second countdown will start, during which the bomb can be defused. Defusal can be done by the defending team (also by right-clicking the door), but it only takes 3 seconds. If the bomb gets defused and doesn't blow up, it does not count towards victory. Blowing up either of a pair of doors count, and, in fact, both doors will disappear when one blows up, allowing people on the other side to pass.
Between the pairs of doors you will find force fields that have to lowered. The first force field (over the reactor core) has 2 disabling panels, the second (in the cargo bay area) has 3. These work a little differently than doors: once the channel is complete, you're free to proceed. Also note that force field controls only open their respective part of the force field (unlike doors, where if you blow one up, the other opens too).
The datacore is just a 1 second channel on either of the 2 terminals in the final room and only serves to finish the warzone.
Skipping the Second Objective
Every now and then a thread pops up on the official forums about people cheating or exploiting in Voidstar. Said exploit involves planting on the second pair of doors without having the preceeding forcefields open. The only exploit here is the exploitation of player stupidity.
As you might have noticed, there's no forcefield in the middle part of the reactor core. Since the two banks of the reactor chasm are close (less than 30 meters apart), if someone from the defender team is kind enough to stand a the edge (where the speedup mod is), it is possible to leap to them. Doing this with a, say, Juggernaut makes it pretty obvious, but since patch 3.0 stealthers have leaps (Phantom Stride/Holotraverse) too. This means players standing there can be leapt to in stealth, without them noticing. From that point it's easy and usually unexpected to plant on the doors.
As a side note here, the lack of any barriers allow defenders to get back to the other side if they have a friendly leap (Intercede) or a Sorcerer pulls them with Extricate or an enemy passes by within hostile leap range. Note, however, that doing these is fairly dangerous as they still allow stealthers to get across. (Also, if a Sorcerer stands there on the edge for a pull, they're trivial to knock down, unless they are whitebarred.)
Dying and Respawns
Attackers have unlimited respawns, while the defender spawn areas have a 30 second door timer. If you die as a defender, you will respawn before the next pair of uncaptured doors. If the corresponding force fields are not down yet, the respawn door is always open. It, however, closes the moment one of the force fields gets lowered. Using this as a defender you can be ahead of your enemies when they're trying to run ahead.
Strategy
As a defender, you don't really have the luxury to resort to any specific tactics, you will have to adapt to whatever the attacker team comes up with. If you are guarding alone, the only way you can lose a door to one attacker is if you stand within range of their 8 second mez, so they can immediately start planting the bomb. The best way to guard is slightly behind cover, with an easy way to move out of it and attack if needed. This forces them to come close to you to CC, while losing out on time trying to get back to the door. Usually, unless you get mezzed right from the capture area, you do not need to use a CC breaker to stop a planting.
If you are overwhelmed by the attacking team, any stealthers in your group might want to stay hidden while the rest of the team is getting obliterated, so they can throw in an interrupt or two, potentially allowing the respawn door timer to expire and your allies to get back to the fight. Doing this 2-3 times a match might fully prevent the other team from capturing. Sure, their numbers won't look that good on the scoreboard, but they've just won the game for your group.
When it comes to attacker strategies, these are the most common ones:
All to one side: Well, this is simple. Everyone goes to attack the same side, trying to wipe out the whole enemy team.
Even split: Roughly half the team goes left and the other half goes right. The point of doing is pressuring both sides, forcing the enemy team to split and hope that you can overwhelm one side at some point.
All to one side with stealther: Everyone goes to one side, except 1-2 stealthers that try to surprise the guard on the other side.
Lure and cap: This makes for some scenic captures if you can pull it off. The basic observation here is that you do not need to kill the other team to capture a door; it's enough if they just don't look. Every now and then you can try to plant the bomb when you expect them to have their attention elsewhere: who knows, it might work. (Sometimes it does.)
If you managed to plant, use AoE attacks to best prevent any defusal attempts. Because the defusal timer is short (3 seconds), do not leave anyone alone to guard a bomb. If it was a solo stealther that managed to plant, do your best to get there and help them interrupt.
Once a door has been breached, the best tactic is for someone fast (Operatives really shine here) to go ahead and try to get the next set of objectives while the rest of the team is actively slowing the defenders. If your team does this properly, it's very easy to just speedrun from the first door to the datacore, ensuring yourself a quick win. As a defender, be on the lookout and when some objective is lost, get to the next one as fast as you can.
Peeking into the defender spawn
Thanks to an age-old clipping bug, if you're attacking, you can peek into the defender spawn and see most of the players there, even if they are of the opposite faction. Here's how to do it.
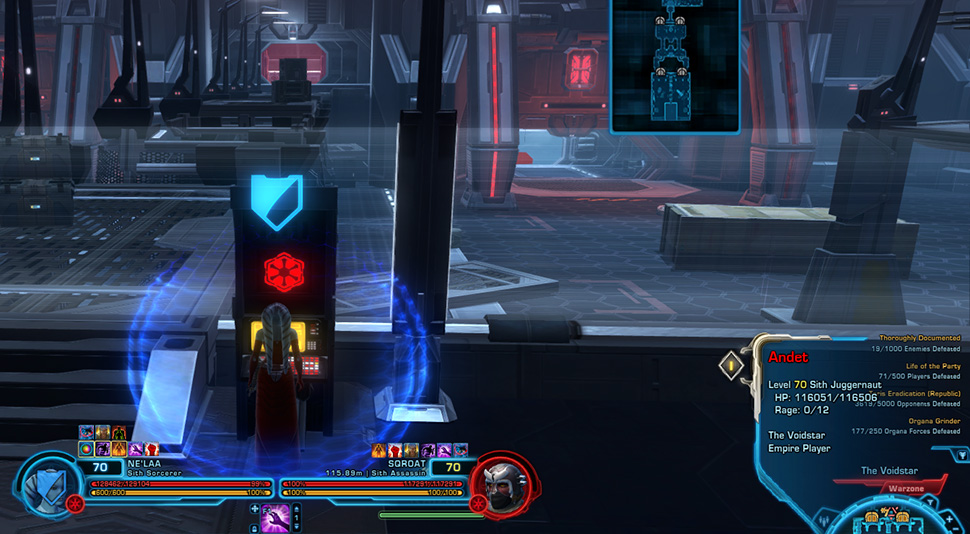
Stand in the position and face your camera in the way shown on the screenshot (make sure what you want to see is above your own spawn barrier) and zoom out as much as you can. If you hover your mouse over the boxes on the bridge, you can hover over and select enemies with your mouse. You can see on the screenshot that I have a Juggernaut from the enemy team selected.